
Facebook Groups have transformed the way we connect and engage with communities. Imagine having a space where like-minded people can gather, share insights, ask questions, and build relationships. Whether you’re a brand looking to foster a community around your products or an individual wanting to unite people around a shared interest, creating a Facebook Group can be a game-changer. In this post, I’ll dive deep into how to create a Facebook Group, manage it effectively, and leverage it for your brand’s growth.
Key Takeaways
- Facebook Groups provide a unique space for interaction and engagement, offering businesses the opportunity to build community and foster loyalty. Unlike Facebook Pages, which broadcast information, Groups enable two-way conversations where every member can post and interact.
- Creating a Facebook Group involves several steps: defining the group’s purpose, naming the group, inviting members, setting privacy options, and customizing settings such as group photo and description. These steps help align the group with its goals and attract the right audience.
- Effective management includes setting clear rules, engaging regularly with posts and live events, and recognizing active members. Consistency in posting and creating a welcoming environment encourages ongoing participation and interaction within the group.
- Facebook Groups can personalize a brand, show customers that the business cares, and build a strong community. They allow businesses to learn from customers and prospects, facilitate networking, and help customers support each other, enhancing customer satisfaction and loyalty.
What is a Facebook Group?
A Facebook group is a page created on Facebook to allow a group of people to engage on a shared topic. Businesses and organizations frequently use Facebook groups to market and inform their customers and prospective customers about various products, events, or industry updates.
Facebook groups can be used for various purposes, but some popular ones for businesses include networking, building customer relationships developing brand ambassadors, and serving as a support resource for customers in need.
It is generally a good idea to set a goal before creating a Facebook group. Having a clear purpose and target audience in mind will help you correctly configure your Facebook group, starting with the name of the group, and going all the way down to the fine detailed copy. To create a Facebook group, you must make decisions such as whether it should be private or public, who will manage comments if it should target a specific location, and if it will be used for social selling. This guide will walk you through the process and provide reasons why it will benefit your business in the long run.
Why Create a Facebook Group?
Before we dive into the steps of creating a Facebook Group, let’s talk about why you should consider doing it in the first place. Did you know that as of 2023, over 1.8 billion people use Facebook Groups each month? That’s nearly a quarter of the world’s population! (Source: Facebook Newsroom).
Facebook Groups offer a unique space for interaction that is different from traditional pages. Unlike pages, which are often used for broadcasting information, groups are designed for interaction and engagement. In a group, every member can post, comment, and engage in conversations. This makes it an excellent tool for building a sense of community and loyalty around your brand or interest.
I remember the first time I created a Facebook Group. It was for a local book club I started with a few friends. We were all passionate about reading and wanted a place to share our thoughts and organize meetups. Little did I know, the group quickly grew beyond our initial circle of friends. People from different cities started joining, and it became a thriving community. We had lively discussions, book recommendations, and even virtual meetups. The sense of belonging and shared passion was incredible.
How to Create a Facebook Group Page
Creating a Facebook Group is simple. The following are step-by-step instructions:
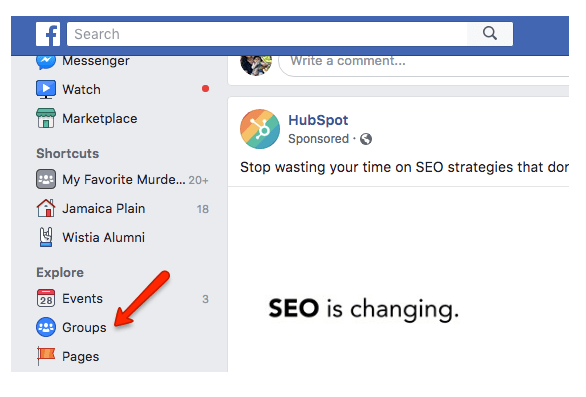
#1. Go to the “Groups” Button Under “Explore” on your Newsfeed Page
The first step is to click the “Groups” button (shown below), which is located on the far left side of your newsfeed page when logged into Facebook. Click that button and proceed to step two.
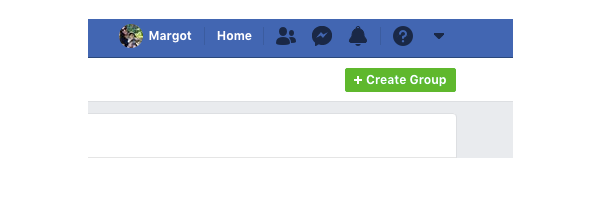
#2. Select “Create Group” in the Upper Right Corner.
After completing step one, you will be directed to a page containing all of your Facebook group information, some pending group invitations, and most likely far too many “I lost my phone” groups formed in the early 2000s. Ignore the nonsense and move to the top right corner to push the green button that reads “+ Create Group.”
#3. Select your Group Setting
Now the real fun starts! The first thing is to edit your group settings so that they align with the purpose and mission of your Facebook group.
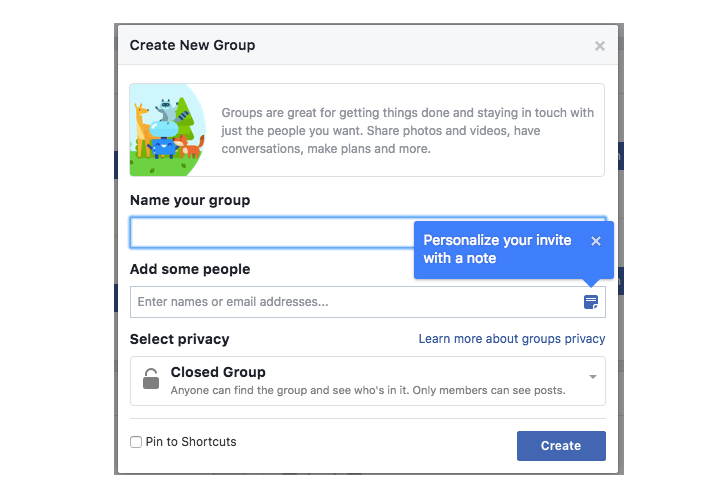
Initially, you will be asked to:
- Name your group.
- Invite people.
- Select your privacy options.
Your Facebook group’s name should be brief, sweet, appealing, and direct. Don’t try to be secretive here; the name should clearly reflect the content and purpose of your group.
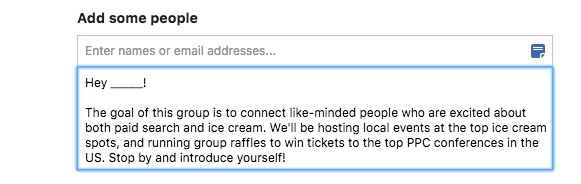
The ideal technique for inviting people is to personalize your invitation with a short note, which Facebook will suggest you do. Providing some context for why these persons should join will increase your chances of building a community faster.
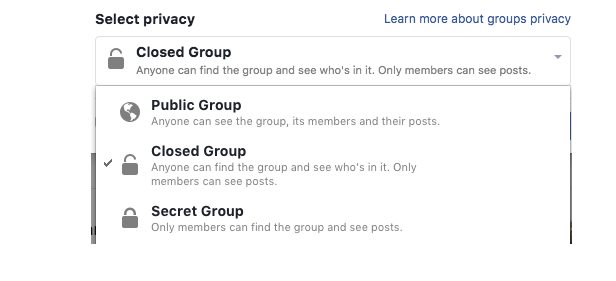
Finally, select your privacy settings. Do you want your group to be open and searchable by the general public, closed so that anybody can find it but only members can post, or secret and very exclusive (meaning only members can find and post to it)?
Obviously, there are many factors to consider when making this decision, but keeping your group’s primary objective in mind will most likely help you determine the best alternative. For example, if you want your Facebook group to generate leads, it should be public. However, if it is solely for customers or contains sensitive information, use the “Closed” option.
#4. Upload your Facebook Group Photo
Your Facebook group photo may seem like a minor feature, but it is one of the most crucial. In fact, you should probably skip the invite part of step 3 until you’ve finished this step!
Think of your group photo as a book cover. It must be visually appealing while also serving the group’s mission. If your group is all about practicing yoga, and you show me a picture of someone playing soccer, I’m going to be quite perplexed.
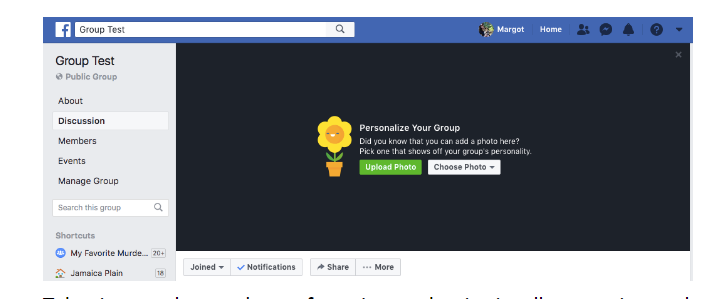
Take the time to select the ideal image that is both visually appealing and contextually appropriate, and ensure that it uploads correctly to fit the frame size.
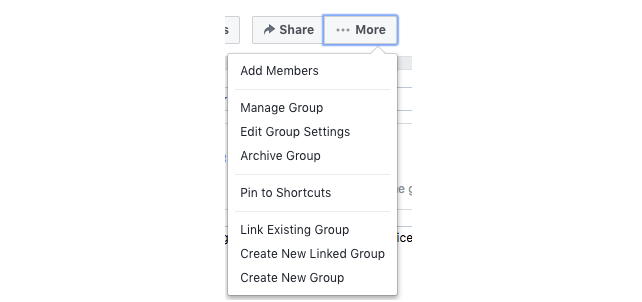
#5. Edit your Group Settings
Now that your group is up and running, it’s important to look further into your settings to ensure it’s configured correctly. To change your group settings, go to the “More” section underneath your photo and select “Edit Group Settings.”
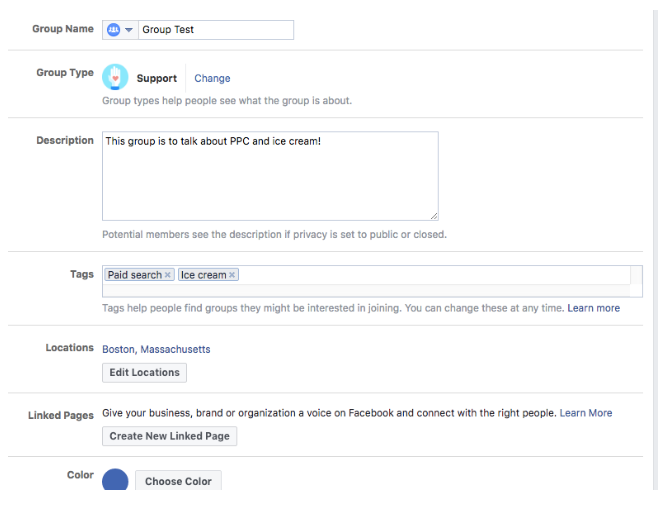
Within this section, you’ll find many options to further customize your group. A few to pay attention to are:
- Adding a group description
- Selecting a group type
- Adding tags
- Specifying location
Making these adjustments will provide group members with additional context about how your group runs, as well as help new potential members and leads find and join your group.
Of course, there are plenty of other options for customizing your Facebook group. Some of the features include linking to other pages, selecting a group color, customizing your group’s contact information, adjusting your privacy settings, determining membership approval, and using the “ask a question” option to learn about new group members.
#6. Create your First Post! (Make it Interactive)
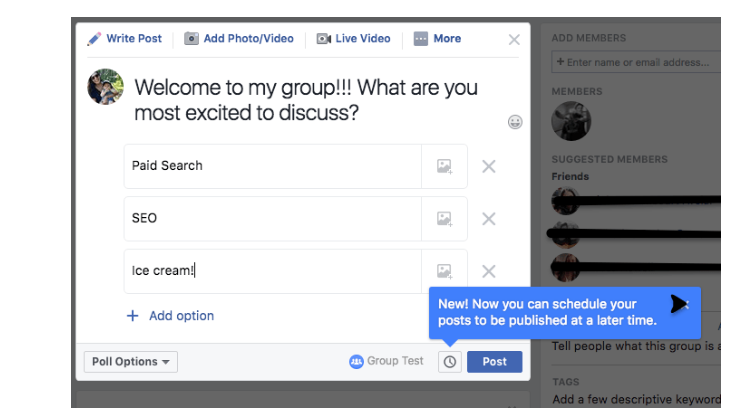
How exciting: it’s time to create your first Facebook group post! The pressure is on because you want your first post to be as interesting as possible. Fortunately, Facebook makes that easy with features that allow you to tag friends, ask for recommendations, and my personal favorite, poll your group members.
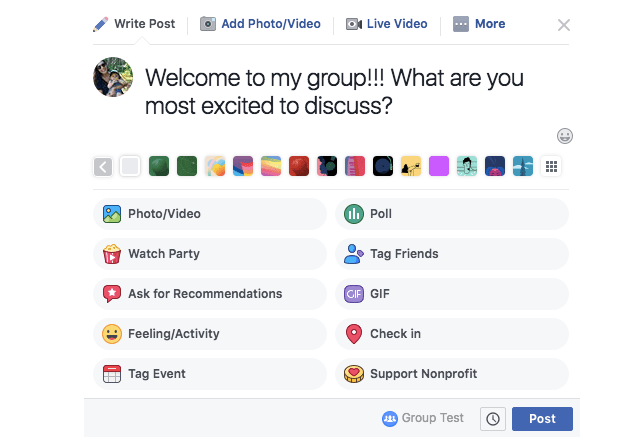
Engaging with your audience and polling them on what they want to discuss is a terrific way to get your group off to a good start. Give it a shot.
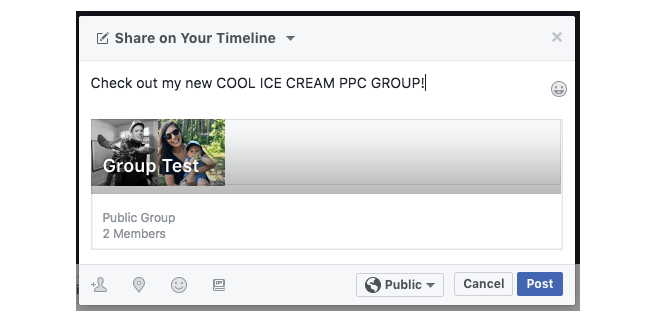
#7. Promote your New Facebook Group!
Last but not least, you must spread the news about your new, exciting Facebook group. Facebook provides numerous alternatives for marketing your group, including sharing on your own timeline, sharing in another group, sharing on a friend’s feed, participating in an event, sharing in a private message, and so on. Start spreading the word with these simple features!
You may even go a step further and email your colleagues to promote your organization to their personal networks. Perhaps you can even run a paid campaign to encourage others to join. Whatever you do, make sure you do something to get the word out there.
Benefits of Creating a Facebook Group for Your Business
You now know how to create a Facebook group page. But you may still be wondering why.
With so many options and venues for creating an online presence these days, it is essential to assess the value of each to determine whether the time commitment to managing your Facebook group is worthwhile. Will there be a ROI? This is the first question all marketers ask.
See infographics for some useful benefits that will help you decide whether creating and maintaining your own business Facebook group is a good fit for your present business goals.
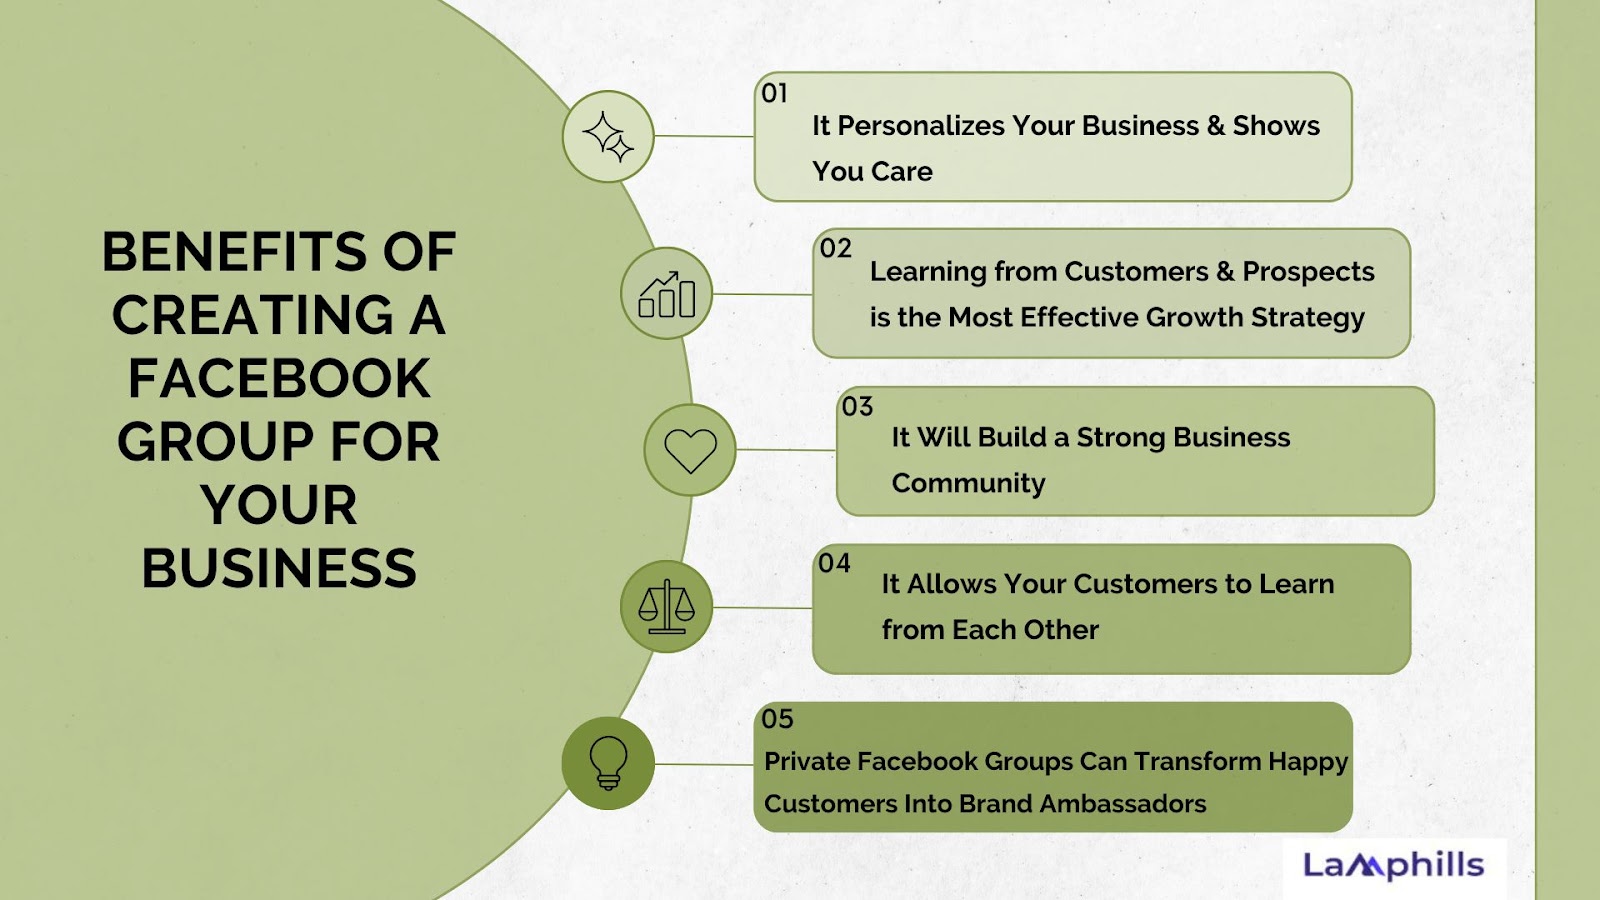
#1. It Personalizes Your Business & Shows You Care
Maintaining a Facebook group differs from maintaining an Instagram page or Snapchat account since it allows for a greater level of interaction with participants.
Facebook groups are meant for high levels of involvement and conversation, so keeping one of these platforms helps your business develop a feeling of community, showing your audience that you genuinely care about what they say.
#2. Learning from Customers & Prospects is the Most Effective Growth Strategy
Giving customers a voice has numerous other benefits, the most important of which is that it may assist inform your business strategy and guide you in the right path when determining what to focus on next.
#3. It Will Build a Strong Business Community
Aside from the benefits of creating your own business, a Facebook group can help you interact with other individuals who share your interests. Allowing your audience to develop these relationships on your platform is only going to help them grow, and better reflect on your company as a place they truly respect.
#4. It Allows Your Customers to Learn from Each Other
Allowing your customers to help each other and answer each other’s questions will make your support team eternally grateful. Not only will it free up time for your customer support representatives to work on other initiatives, but it will also allow your customers to connect and assist one another to grow. A business Facebook group can help you convert your customers into self-sufficient followers by exchanging ideas, addressing queries, and sharing success stories.
#5. Private Facebook Groups Can Transform Happy Customers Into Brand Ambassadors
Finally, a well-managed Facebook Group can help turn regular customers into actual brand champions. Creating a community and a space where your audience members can interact and grow, will provide them with a deeper love and appreciation for your brand.
Creating a successful Facebook group starts with a solid foundation. Our free Facebook Group Setup Checklist outlines the essential steps to get your group off the ground. Download it now to streamline the process and ensure your group’s success.
Tips to Engage and Manage Your Facebook Group
#1. Create a Welcoming Environment
Creating a pleasant environment is essential for every Facebook group. It is not only about providing an environment for individuals to connect but also about instilling a sense of community and belonging. Encourage new members to identify themselves in a welcome post and discuss their hobbies or why they joined the community. This can make kids feel more connected and involved.
#2. Schedule Regular Posts
Consistency is essential for keeping your Facebook group active and engaged. Regularly sharing useful content can spark conversations and keep members coming back. This could contain industry news, thought-provoking debate topics, or helpful resources relevant to the group’s interests.
#3. Host Live Events
Live events are an excellent approach to promote real-time conversation and participation in your Facebook group. This could take the form of Q&A sessions, webinars, panel discussions, or even informal hangouts.
#4. Recognize and Reward Active Members
Your Facebook group relies on active members to function. They contribute to discussions, provide key insights, and help to build a vibrant and engaging community. Recognizing and honoring these members can help to promote a sense of belonging and encourage long-term participation.
#5. Facilitate Networking and Collaboration
One of the most significant advantages of a Facebook group is the possibility to network and collaborate. Encourage this by developing threads or specific locations where people may introduce themselves, explain their professional information, or discuss their interests and goals.
How do I create my own group on Facebook?
Here is How to Create your own Facebook Group:
- Go to Facebook and log in to your account.
- Click on the Groups tab at the top of the page.
- In the left-hand column, click on the Create Group button.
- In the Create a Group window, enter a name for your group.
- Select a group type.
- Select a privacy setting.
- Add a description for your group.
What is the difference between a Facebook group and a page?
A Facebook Page is essentially a digital storefront for your business, brand, or organization. It’s a one-way communication channel where you share updates, promotions, and other information with your followers. Think of it as a broadcast medium. A Facebook Group is a community-focused platform where people with shared interests can connect and interact. It’s a two-way conversation, allowing members to share ideas, ask questions, and engage with each other.
Are Facebook groups free?
Yes, creating a Facebook group is completely free. You don’t need to pay any fees to set up a group, invite members, or manage its content. However, keep in mind that running a successful group requires time and effort, which can be considered an indirect cost.
Can a Facebook group be monetized?
Yes, Facebook groups can be monetized. While Facebook doesn’t directly share ad revenue with group admins as it does with Pages, there are several indirect ways to generate income from your group.
Can I turn my Facebook group into a page?
Unfortunately, you cannot directly convert a Facebook group into a Facebook Page. The two platforms serve different purposes and have distinct functionalities. A group is designed for community interaction, while a Page is for broadcasting information about your business or brand.
Conclusion
Creating and managing a Facebook Group can be a powerful tool for building a community, engaging with your audience, and growing your brand. From setting up the group and customizing it to managing and leveraging it effectively, each step is crucial for success.
So, are you ready to start your own Facebook Group and take your brand to the next level? What challenges do you foresee in managing a Facebook Group for your brand? Share your thoughts in the comments below!
Related Articles
- Creating Engaging Content on Facebook Reels: Best Practices and Tips
- How to Get Followers on Facebook: A Guide to Building Your Business Facebook Page from Scratch
- How to Create a Facebook Ad: A Step-by-Step Guide for Beginners
- Interactive Facebook Posts: Level Up Your Marketing Strategy